 |
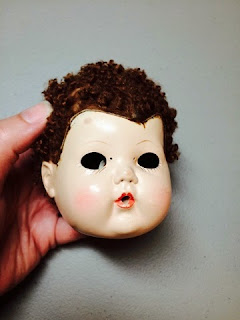
| This Tiny Tears doll had fallen eyes. |
Yesterday I wrote a
post about my restored Tiny Tears doll and today, as promised, I will show you how she got that way. Tiny Tears came to me in a box of project dolls . She had her glass bottle but nothing else. Her eyes had fallen back into her head so it looked like she didn't have eyes. Her rubber body was dirty and darkened from age and her face had a few dings and scratches in the paint. For the most part, however, she was in really good shape. I knew if I could fix her eyes I could get her looking adorable again.
 |
| The eyes are connected to a system of tubes. |
 |
| This piece connects the crying and wetting tubes. |
I had a terrible time trying to get Tiny's head off her body. I was scared the rubber body would tear. The seams in the hard plastic head started to separate. Finally I found a doll blog that recommended heating the rubber body with a hair dryer to make it pliable enough to remove the head. That worked.
The first thing I noticed when I got the head off was a very elaborate system of tubes to make the doll wet and cry real tears. I removed these carefully and tried to figure out how everything should be placed.
 |
| Heat the rubber body so the head will come off easily. |
 |
Make sure you understand how all the tubes are supposed
to connect before you remove them. |
I fished the eye mechanism out of the head and was relieved to find the eyes clear. One had a few missing lashes but I replaced those without much trouble. You can see, when you look at the metal frame holding the eyes, why crying eyes are a bad idea. The water rusts the eye mechanism and rots the lashes so they fall out.
 |
| The eyes |
Nevertheless, I wanted the doll to work as she was originally intended, so I placed the crying tubes on their posts and made sure they were secure. This is easier to do with the eyes out, but you have to be careful not to knock them out of place when you put the eyes back in. I found tweezers necessary for placement of the tubes.
 |
| One eye tube in place |
Usually I set eyes such as these with epoxy down the center bar, so that's what I did in this case.
 |
| I tried to set the eyes with epoxy. |
This appeared to work until I tried to get the rest of the tubes in place. As you can see if you look closely, the epoxy blocked the bar for the tube placement and knocked of the tubes out. With the epoxy in the head, the eye on the weight side also fell way back inside the head when the weight moved. I had to remove the eyes and take the epoxy out. My engineer husband looked at the head and said the eye bar has to crimp into little grooves inside the head. This allows the central bar to shift from side to side and keep the eyes evenly flush against the eye sockets as they open and close. So he placed them for me, and even though it makes me nervous to have eyes without epoxy, that is how they were to begin with and so far they're working.
 |
| The eyes after placement. |
So, to get the eyes in, place the middle bar over the raised plastic section inside the head and crimp the sides of the bar into the little grooves inside the eyes. Then connect all the tubes to the proper place. The eyes should open and shut and water should come out when you feed the doll and turn her face down.
Once the eyes are placed and working, attach the center plastic bar to the tube in the insert piece, heat the body, and push the neck back into the head. After you do this, you might notice the sleep eyes no longer open and shut as they were. I saw this and panicked. The eyes worked fine until the body was on. I took the head on and off the body several times and saw the metal spike in the insert piece seemed to be interfering with the side weight of the eyes, causing them to stay open.
More Internet research turned up something I'd never heard of: "Rock-A-Bye" eyes. You have to rock the baby side to side and her eyes will gradually close. Sometimes you have to turn her head to get the weight off the metal piece so they will close.
 |
| Treat the body with baby powder. |
 |
| There's still some discoloration. |
Once I figured the eye situation out I sealed the head seams with epoxy and touched up the eye, lip, and cheek paint where it was scratched. I painted over the side seams after the epoxy repair. Then I tackled the body.
The rubber body has darkened but doesn't have any hard places or splits, which is kind of unusual. Rubber rots easily, especially if exposed to light. I gently cleaned the body with a Mr. Clean Eraser and then with dish soap and water. I dried the body. Then I rubbed baby powder all over the body with my fingers. Any powder that wouldn't rub in I wiped away with a tissue. This treatment helps lighten the rubber and keeps it from getting sticky. There are still a few dark spots, but they aren't nearly as bad as they were.
 |
| The restored doll |
 |
| The face after repainting and eye repair |
Tiny Tears is just too cute! I have her for sale with a huge layette set with several original 1950s pieces and a trunk. I hope you will look in my
Atelier Mandaline store or browse my
catalogue for her and many other dolls. Below I've included a set of photos showing the Rock-A-Bye eyes in action.
 |
| Tiny is awake. |
 |
| She's getting sleepy. |
 |
| Finally asleep. Shhh! |


Comments
Post a Comment