 |
| A new mama cryer box |
Today I replaced my 1969 Effanbee Sugar Plum's original broken "mama" cryer box with a new one, and I remembered to take photos of almost the entire process so I thought I'd share. You may order a brand new replacement cryer from my store, along with many other doll parts and repair supplies, so please check:
http://stores.ebay.com/atelier-mandaline or
https://www.etsy.com/shop/AtelierMandaline.
Lots of baby dolls and even little girl dolls, such as Ideal's Posie, came with these boxes, especially from the 1930s to the 1970s. They say what's supposed to be "Mama" but sounds more like "wah wah". This tutorial shows how to replace the box or add a new box to a cloth body doll with vinyl, plastic, composition, or other material limbs.
 |
| The head will be attached with a zip tie or cord |
My doll had stopped crying, and I could feel the box sliding around inside her, so I removed her head by cutting through the plastic zip tie securing the head. If your doll's body has a seam down the front or back you can just open it up to replace the box and then re-sew it. I removed the box to see if I could fix it but it was all rusted out. I forgot to photograph the process, but it looked just like the new plastic box only it was made of cardboard with a Masonite weight inside. The speaker top with the holes was metal and this had completely rusted, so the box was full of rust, and the body of the doll was marked by the box. This turned out to be helpful because I could see from the outside exactly where the box should go.
 |
| The old cryer marked the body. |
To replace the cryer first remove the head and then carefully pull out the stuffing until you reach the original box. Save the stuffing to re-stuff the doll! If you are adding a cryer to a doll that didn't have one just remove stuffing down to the shoulder blade area.
 |
| Remove the stuffing and save it. |
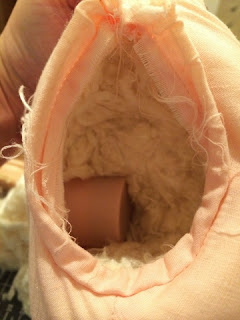
You can place the cryer two different ways. If you place the smooth side of the box (the side without holes) against the doll's back the doll will cry when you lay her down on her back. This position results in a much quieter cryer as well. This is the method I chose for Sugar Plum.
 |
| The smooth side of the box against the cloth back makes the doll cry when on her back. |
If you place the cryer so the side with the holes is against the cloth back the doll will cry when you lay her on her stomach. This doll will cry much louder than the other position.
 |
| The holed side of the box against the cloth will make the doll cry when on her stomach. |
When you have your box placed as you want it move the doll to make sure she cries like she's supposed to. Then thread a new zip tie or cord through the neck casing. You will need small width ties used for electrical work. Most regular hardware stores don't carry the thin ones, so you will probably need to get them from Radio Shack or other electronics or electrical supply store. You can also use a drawstring if you prefer.
 |
| Thread the zip tie through the casing. |
Now stuff the body back as tight as you can. If you don't use enough stuffing the head will be floppy. If you are using the original stuffing the amount should already be correct.
 |
| Don't tighten the zip tie any further until the head is properly positioned. |
Zip ties can't be undone once they are pulled through, so make sure the groove in the doll's neck is positioned properly under the casing.
When you have the doll's head positioned pull the zip tie so it's not quite as tight as it will go. Make sure the doll's head isn't floppy or anything. Then pull the tie as tight as possible.
 |
| Pull the tie as tight as possible. |
When the tie is tight as it will go cut the excess off with scissors. Get the cut edge as close as possible to the closure. If you are using a drawstring double or triple knot it and leave long enough ends to tie it again if it comes untied.
 |
| Cut as close as possible. |
The zip ties edges are usually quite sharp once they are cut. Obviously, this is not desirable in a child's doll because it can really scratch. Therefore, you will need to sand the cut edge down after you cut it, and it also helps to make as straight a cut as possible, not an angled cut.
 |
| Sand the cut edge with a sanding block. |
Test the edge to make sure it's smooth. When it feels like it can't scratch a child or adult you are finished. Your doll is all ready to cry for her mama when she's put down! Sweet Sugar Plum will be available in my store soon, so make sure to check!
 |
| Check to make sure the edge is smooth. |
 |
| Your crying doll is finished. |


Comments
Post a Comment