 |
| Before and After |
One of the most rewarding things about my job is meeting people literally from all over the world, who I would never meet otherwise. Yesterday I spent a good chunk of the morning "talking" via email with a lady in India about how to clean her doll and then I got to work on a doll's head which arrived in the mail from South Dakota. I'm not sure exactly who this baby is; she's marked I.C. on the back of her neck. That mark was used by Italocremona, an Italian company, and also sometimes by IMPCO and Eegee here in the USA. I'm pretty certain she's not an Italocremona doll because those had very distinctive faces. This doll looks like she used the Madame Alexander Kathy baby molds or very similar molds, so I assume she is what is know as a "grocery store" doll: a less expensive copy of a high end doll. Many grocery store dolls used the exact same molds as the dolls they were copying and were just made with somewhat less expensive materials.
 |
| The doll before restoration |
Regardless of whether she was a high-end doll, this baby was and is a much-loved doll and that showed. She had a lot of damage. Her eyes were broken and someone scraped up the eye socket around the broken eye, trying to get it to open and close again I assume. Her little stylist pierced her ears and, not content with that, went on to give her a sort of tribal tattoo around her lips and here and there on her head.
 |
| Begin by cleaning the doll. |
I began my restoration by cleaning the doll. I use Mr. Clean Erasers and various brands of doll cleaners, such as Carol's Miracle. After I got her as clean as I could I sized her eyes.
 |
| The original eye compared to a new eye. |
This doll can take either a 17 mm eye or a 20 mm, possibly as large as a 22 mm if you could find a pair. The doll's owner originally wanted blue eyes, so I was really hoping to use a 17 mm because my supplier is out of the 20 mm in blue. Unfortunately, the eye with some gouges out of the socket just looked too large for the 17 mm and the 20 mm is just perfect. Luckily, since doll's eyes were originally a hazel green, the owner decided she preferred brown after all.
 |
| The doll with new eyes |
Baby does look sweet with her big brown eyes! I went on to tackle the mouth tattoo and the various stains and scratches I was unable to clean away. To begin I used acrylic super heavy modeling gel to fill in the holes rather like spackle. You could also use acrylic modeling paste, which isn't quite as thick. I used the heavy gel to glue the new eyes into place as well.
 |
| Fill the holes with super heavy gel. |
 |
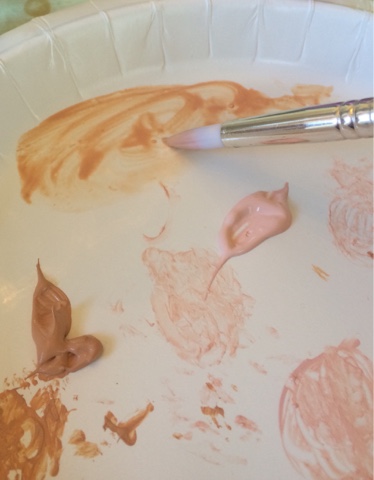
| Tint the get with acrylic paint. |
To begin, tint the heavy get with acrylic paint in the doll's skin tone. The heavy gel dries extremely quickly, so just mix up a tiny amount at a time.
 |
| Brush the tinted gel over a hole. |
Working on one or two holes at a time, brush a little tinted gel over the hole.
 |
| Wipe away the excess gel. |
Then wipe the excess gel away with a paper towel. This works the gel into the hole and removes it from the doll's skin. It is pretty much the exact same process as you use to
repair crazed composition, except with acrylic paint.
 |
| A couple holes after being filled. |
 |
| All the holes after filling |
As you can see, filling the holes makes a big difference immediately, but since they're still visible I went on to paint them. Before painting, I had some deeper holes to fill.
 |
| Deep hole after first filling |
 |
| Deep hole after several fillings. |
Deep holes like the one in the baby's temple will require more than one filling. Brush your gel on and wipe it away. Let it dry and repeat with another layer of gel. The layers dry quickly. Keep layering gel until the entire hole is filled.
 |
| Paint over the filled holes. |
After the gel has dried, paint over the filled holes using acrylic paint. This may be sufficient if you don't have widespread discoloration on the doll.
 |
| Thin the paint with water. |
 |
| Brush the watercolor all over the surface. |
If your doll has lots of stains and scratches like this one, or if the painted repairs are still somewhat visible, you can apply a wash of watercolor. Thin the acrylic paint you've been using with water until it flows easily. Flood the surface of the doll using a watercolor brush, being careful to avoid getting paint in the eyes. Dab any drips with a paper towel before they dry. Work in one small area at a time, as the paint will dry quickly. Allow the paint to dry.
 |
| Making more watercolor |
Since I already had paint out I decided to go ahead and paint over the doll's molded hair, which had a lot of paint loss. I used the same watercolor technique on the hair as I used on the face.
 |
| The re-painted doll |
Once my client signed off on the doll I sealed the paint job with a thin coat of acrylic matte varnish. Now Baby should be ready for another 50 or 60 years of play! This doll is a patient and belongs to her owner, but I have many similar dolls in my shops on
Etsy,
eBay, and
Facebook, so I hope you'll check.
 |
| The finished doll |


Comments
Post a Comment