Patti PlayPal's Eyes
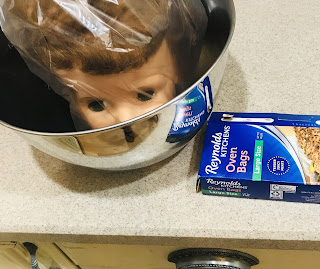
In order to get to the eyes to use the Cut Method, however, you still have to do some boiling. Patti PlayPal's neck opening contains a metal disk. This disk attaches to the stringing hooks to join the head to the doll's body, and it's larger than the neck opening. To remove it, place the doll's head in an oven bag inside a large heat-resistant bowl. Place the doll's head in the bowl and pour boiling water in until it covers the lower neck opening, about two inches up the neck. Let the head sit for around eight minutes until the neck is squishy.
When the neck vinyl is squishy, reach inside the head with pliers and turn the disk sideways. Then pull it out of the neck. When you've removed it you will see the head is stuffed with foam. You will need to remove all the foam.
Removing the foam is tedious and usually pretty gross. The foam is usually old and sticky and often moldy. I charge a $10 fee on top of my eye replacement fee, which is currently $50, if I have to remove the foam. I am allergic to dust and mold and it's very hard on me. So if you are sending your doll to my hospital for eye replacement please remember to remove the foam before you send her. Make sure to remove all the foam. If it's not too dirty you can save it to refill the head later.
When the foam is removed, proceed with the Cut Method: cut an X or circle in the eye pocket inside the head. Then push the old eye out into the inside of the head. Don't remove too much of the eye pocket inside the head; you need something to hold the new eyes in place.
Because Patti uses a 27mm eye, which is about the size of a buckeye or small walnut, you will not be able to push it into the front of the face. At least, I haven't ever been able to do so. The neck is so long and narrow you can't reach into it to place the eye. Therefore, I use a 10 inch curved hemostat (available from my Etsy shop) to place the eye. I cut away a circle of the eye pocket inside the head large enough to just set the eye on it. Then I use the hemostat to push the eye into the remaining pocket. When the eye is set and pushed forward into the front of the face I use a chopstick to glue the backs of the eye pockets closed, just as usual with the Cut Method. Allow the glue to dry completely.
When the glue is completely dry, re-stuff the head using the original foam. If the original foam is too dirty you can use fiber stuffing from the fabric store, like the stuffing used in pillows and rag dolls. Don't stuff the head completely to the neck opening; leave a few inches of the neck empty so the foam doesn't get wet when you warm the head to re-insert the disk. I like to stuff a tissue paper plug into the neck to keep the foam from falling down. Only use white tissue paper, not dyed paper. Place the head in the oven bag again and warm the neck the same way as before. The oven bags sometimes leak a tiny bit, so that's why I don't stuff the neck all the way to the opening. It also makes it easier to insert the disk to leave it a little empty.
Push the disk into the warmed neck. It helps to turn it sideways as shown. You will have to press very hard.
When the disk is inserted, use your pliers to turn it and pull it up into the base of the neck as shown.
Here are the finished dolls, all ready to restring! You can buy doll supplies, eye replacement kits, restringing kits, and my Doll University book to learn all general doll repairs, as well as finished dolls from my shops. Link to all from https://www.mandaline.com/. You may also fill out a request to send your doll to my hospital on my website.


Comments
Post a Comment