 |
| Muffie as Red Riding Hood |
A while back I bought a lot of dolls the seller was calling "Dress Me" dolls because I spotted a Muffie in pieces among the other dolls. Nothing else in the lot was worth much, but Muffie cleaned up well into a beautiful 1950s doll.
 |
| Muffie after restoration |
 |
| Muffie is marked. |
Muffie needed re-stringing and cleaning. One side of her wig was perfect but the other was a mess and had to be re-styled. Once I made those repairs only one flaw remains: one leg has faded to a lighter color than the other. I decided to dress Muffie in a fairy tale costume rather than a short 50's dress in order to hide the faded leg.
 |
| One leg has faded. |
I keep a large stash of doll clothes in all sizes, and I was able to clothes Muffie entirely in vintage Madame Alexander pieces. Tall stockings and pantaloons cover her legs, and she has black flocked ballet flats. A lace-trimmed crinoline fills out her skirt.
 |
| Muffie's pantaloons and shoes |
 |
| Muffie's crinoline |
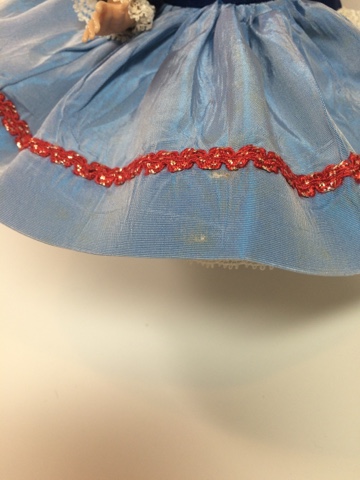
I chose a blue dress tagged "Dutch" for Muffie because the colors bring out her sapphire blue eyes. It's beautifully detailed: the neckline hearkens back to Vermeer's models, and the bodice and taffeta skirt are trimmed with all sorts of soutache braid, ethnic woven flat ribbon, and lace. The only flaws are a couple spots on the skirt.
 |
| The skirt has spots. |
 |
| The dress is tagged. |
When I found the tagged Red Riding Hood cape I knew exactly who Muffie was meant to be: Red. The cape is nearly perfect, although it's old; probably 1960s or 70s. Muffie makes a wonderful Red!
 |
| Red Riding Hood's outfit |
 |
| The cape is tagged. |
Naturally, Red needed a basket to take to Grandmother's house, but I didn't have one. I decided to make one from pine needles, a traditional Carolinas craft practiced by the Native American and Gullah societies here. I filled the basket with a cake made from a puzzle eraser for Grandmother and a felt cover.
 |
| Red Riding Hood's basket and cake |
Poor Red is nervous as she traverses the deep, dark forest. When she sees her grandmother's house she's relieved and happy, having no idea the wolf is lying in wait for her! Muffie is a perfect doll to embody this classic tale! This set would be fun for both collectors and girls to own (please remember vintage toys may not meet today's standards), and such fun to share with a daughter or granddaughter. You can find Red and many other beautiful dolls in my Atelier Mandaline
Etsy and
eBay stores.
Pine needle baskets are such a part of North Carolina history many school curriculums include instruction on making them. I learned to make them in the 6th grade and I still remember how. It's a little challenging to get them really neat when you're making them in miniature, but it does go faster. I've included a tutorial below.
 |
| Begin by tying your grass to the needle bundle. |
To begin you need to gather pine needles. The size of your basket will determine how many you need. You will also need some sort of binding for your basket. Dried grasses are the traditional binder. In the Lowcountry (coastal NC and South Carolina) sweetgrass is often used, which makes the baskets smell lovely. I used raffia which I had on hand from making my
Coastal Christmas ornaments. The thing about grass binders is they are rather messy looking, since the grass isn't the same width throughout the length, so some people prefer to use twine, yarn, or cord. You can dye your binder in different colors and make geometric patterns by changing the binder color. This was the method most often employed by the Indian tribes here. I just used plain raffia. Before using any natural materials you've gathered outdoors you need to heat them to kill any insects hiding among them. I zap mine for 10 seconds at a time in the microwave until they feel hot (usually about 20 seconds total). Do not leave them unattended during this step! Pine needles are extremely flammable.
A pine needle basket is constructed like a coil pot, which you probably made from clay in elementary school. In this case the coils are created from bundles of pine needles. When you decide how large your basket should be you gather needles into bundles of the diameter of the coils or rows. I am using only two sets of needles per bundle for this miniature basket. Line your needles up with the tops even and tie your binder below the tops, on the shaft of the bundle. You will trim the needle tops off later.
 |
| Begin wrapping each bundle of needles with binder. |
After you tie your binder to the needles begin wrapping the needles with the binder as shown above. Then start coiling the wrapped needles into a circular base, making rows of bundled needles. On the second row of the base make three wrap stitches around your needles and then bring the fourth stitch up through the previous row. Then go back to wrapping the row for three more stitches and catch the previous row on the fourth stitch. Repeat this pattern for the remainder of the basket.
 |
| Every fourth stitch should wrap around the previous row. |
 |
| Another view of catching the previous row. |
Whenever you need to add more needles you can lay the new bundle of needles over the ends of the previous bundle, overlapping them. Then continue to wrap binder over them.
 |
| Overlap new needles over old to add needles. |
In the photo above you can see me adding new needles, but you can also see how I transition from the base of the basket to the sides. When I'm making a flat base I wrap the needle rows beside one another. When I want to start building up the sides of the basket I lay the new needles on top of the row I'm replenishing and keep wrapping the row on top, rather than beside, the the previous row. Keep going on in this manner until the basket is as large as you want. Whenever you need to add more binder just wrap the new length around the row and knot it on the inside of the basket.
 |
| Making the handle |
When you are ready to make the basket handle just wrap your row of needles without catching the previous row every fourth stitch, as shown above. Make the handle as long as you want. Then bring the handle over to the other side and sew it to the basket body using the binder. Often, these baskets are made with ornate looped or coiled handles which are quite beautiful. I just needed a utilitarian basket so I made a plain handle. When the handles are sewn on reinforce them by stitching an X with the binder at each place there the handle meets the basket body. Then carefully trim off the needle tops and any knot ends where you added binder and Voila! A Carolina pine needle basket. These aromatic baskets are wonderful for gathering vegetables or berries, storing craft supplies or yard, or any other way you might use a basket.
 |
| A miniature pine needle basket |


Comments
Post a Comment