 |
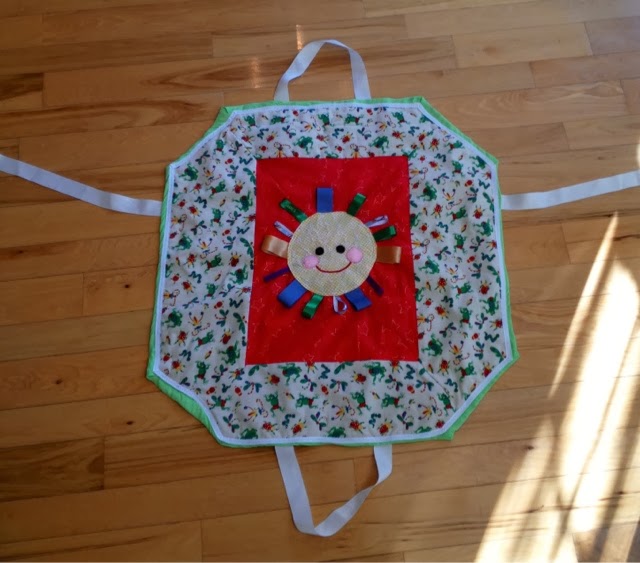
| This portable play mat converts to a bag to carry toys. |
This past weekend we welcomed the arrival of my newest nephew, nephew number nine for me! Although my husband and I find ourselves fertility-challenged, the rest of my family are prolific breeders. Naturally, I decided to wait until the baby arrived to get on Pinterest and look at baby gift ideas. You will find many, many options on my "Gift Ideas", "Kids", and "Sewing" boards. One I thought was fab is a portable play mat for baby that cinches up into a bag for travel. You can order a pattern, and I think a completed mat, from Etsy (see my Pinterest Sewing board for the link), but I wanted something slightly different so I designed my own. I'm hoping my sister will be too busy with her 6, 2, and 5-day old kids to read my blog so this gift is a surprise! If not...surprise!
The original mat/bag is a hexagon, patchworked together of strips of cloth. It's adorable and cinches up into a circular bag with a long drawstring, but I didn't think it looked long enough for a baby to really lie down and play or sleep. The baby in the picture is sitting up. I also didn't have enough matching material to make the drawstring, which looks about four feet long! I decided to make a longer mat that folds into a bag without the use of a drawstring. This makes it less ideal as a bag; small items could possibly fall out the sides, but it's great for carrying larger toys, burp cloths, and things like that. When you get where you're going you can unfold the mat and spread baby's toys out on it.
 |
| Lay newspaper pieces out to the size you want. |
I used newspaper to make my pattern. I like to use newspaper because the fold lines and columns act as measuring guides and make it a lot easier to map out symmetrical pieces. Start by spreading your papers out to the size you want. Tape the edges of the paper sections together to make it easier to draw your pattern out.
 |
| Measure to make sure the pieces are even. |
Start adapting your pattern to get the shape you want. I folded the newspaper pieces into shape, but you could also just draw the pattern out. I wanted a kind of elongated octagon shape, so I folded the corners up. Measure to make sure you have the pieces even. See my cool vintage yardstick? I love it because it's from my grandfather's auto parts store! When I'm not using it to measure I hang it up as artwork!
 |
| This was a little too long. |
I got the mat the size and shape I thought I wanted, but when I tried to gather it up like a bag it was too unwieldy. I decided to make it a little shorter by folding the ends up a bit more. When I had the general shape and size I wanted I measured all around to even out the pieces.
 |
| The finished size. |
Now, I could have just cut a front and back out of fabric and quilted those together, but the patchwork design on my inspiration piece was so cute I wanted to replicate that look. I also didn't have enough fabric for the front and back, just enough for backing. So, I drew the patchwork pieces on the paper.
 |
| I found the center and drew four triangles. |
I started by marking the center of the mat. I drew diagonal lines intersecting at the center to make four triangular pieces. Then, I divided the triangles into two pieces each. You could add seam allowance to your pieces at this point, but I decided to add it when I cut the fabric out.
 |
| I divided the triangles into pieces. |
 |
| I cut out the pattern pieces. |
The look I wanted was a solid -color rectangle in the center bordered by a patterned band. I looked thorough my stash and found a frog and bug print vintage corduroy. I think my mom bought this when she was expecting me in case I was a boy. I was not, however, and we never got any boys, so the fabric passed on to me! I found a cute sparkly star print on red cotton left over from a dress we made for one of my nieces long ago. I thought the sparkly stars would interest the baby and I liked the nature theme I had going. Keeping up with that theme, I decided to use another Pinterest idea. I recently saw the cutest pillow appliqued with a smiley-face sun with "rays" made of multi-color fabric (the link is on my sewing board). I decided to make an applique of a sun with ribbon "tags" for the baby to play with. My kids loved those Taggies books and things as babies, and this is the same idea.
 |
| I added seam allowance to the fabric before I cut. |
 |
| Marking the seam allowance. |
When I'd picked the fabric it was time to cut. I added seam allowance of 5/8 inches by measuring from the folded edge on one side and marking the fabric with pencil on the other sides. I cut along the pencil marks. On the backing fabric I measured out 3 inches to add fabric for a "cheater" binding. That turned out to be a bit much so I trimmed it to 1 1/2 inches when I cut it out. I will write more about this later.
 |
| I add the extra fabric for a cheater binding. |
For the sun applique I picked a yellow embroidered gingham scrap left over from a dress I made my daughter years ago. I thought the baby would like the pattern of the embroidery to feel and look at, and I don't have enough of this to make much of anything else. I love the sunny color, too! I remember, with her dark skin and black hair, my daughter looked like a little Black-Eyed Susan in her dress!
 |
| I cut one circle of fabric and one of interfacing for the applique. |
I traced a bowl to make the sun circle. I cut fabric and interfacing and then cut the interfacing 1/4 inch smaller all around. I needed interfacing so the fabric wouldn't bind up when I embroidered the face on the sun and also so the applique would look neat. This is a little easier with iron-on interfacing, but I don't have any.
 |
| I clip the edges of the circle so it will fold over without puckering. |
Since the sun is circular, I clipped the edges a tiny bit all the way around to help it fold over neatly. Then I pressed the edges of the fabric over the interfacing to finish the edges.
 |
| I press the fabric over the interfacing to finish the edge. |
After this, I embroidered the face on the sun. I used satin stitch for the mouth and felt appliques for the eyes and cheeks. I machine-stitched the appliques on using blanket stitching. This is a little messy. The unfortunate brain malfunction that made me wait until Wednesday to make a mat I plan to deliver on Saturday caused me to rush. If I do another of these I will take my time and make sure it's neater. When the sun's face was finished I sewed on the ribbon tags. I folded each piece of ribbon in half before sewing and applied them with the loop facing out.
 |
| The finished sun applique with ribbon tags for rays. |
Once I'd finished piecing and sewing the quilt top together I sewed the sun applique on. I considered embroidering "You are my sunshine" across the top of the red rectangle, but my machine only makes small, like shirt-size, monogram letters, so I settled for just putting the baby's name on one of the ribbons.
When the top was all finished I cut a piece of quilt batting the same size as the top and pinned the quilt layers together: top, then batting, then backing. I didn't want to do any large scale quilting on this. My great-aunt always hand-quilts hers with matching motifs, like spaceships on space fabric or flowers on floral fabric, but I don't have time, so I just used a machine clasp stitch, like a little starburst, here and there to join the layers. Then it was time for the binding.
I am unfortunately terrible at binding quilts. Every time I get the quilt all done but the binding it looks great and then when I try to bind it nothing lines up and I end up with this horrible wadded up mess along the edges. So, for this quilt I decided to use a "cheater" binding I saw on Pinterest. You just cut the backing a few inches bigger than the front and fold it over and sew.
Well, it looks easy, but I messed it up pretty good. I think if I'd used a different fabric it would have worked. The only piece I had large enough was a really thin, crepey pique that's also a little stretchy and it just didn't fold over neatly or press crisply. (Again, the procrastination; I didn't have time to shop for fabric!) So, it looked awful as usual and I had to sew a band of seam binding over it to mask it. I used an embroidery stitch for this so it sort of looks like I meant to do it! Hopefully, the baby won't mind.
 |
| Ribbon handles and ties allow the mat to fold into a bag. |
When the mat was all finished I added the handles and ties to turn it into a bag. I added two ribbon handles on top. Then I added one ribbon to each side so the mat can be folded and tied into a manageable-sized bag. If you don't mind a larger portfolio-sized bag you could add two ribbons at each side and tie the sides shut. You could also add two to four ties on each side so even small items stay in the bag. I just felt like it was too large like that, and my sister has a diaper bag to carry small items, so I made the smaller folded option. Another thing you could do with this is add pockets to the mat top before quilting it. Then you could keep diapers or small toys in the pockets and an older baby could play on the mat by putting the toys in and out of the pockets. There are really so many possibilities for this project! I might sew some variations, even without any new nephews, and sell them, if I can get the binding to look better. Check my store for that:
http://stores.ebay.com/atelier-mandaline.
 |
| The play mat |
All in all, I think this is pretty cute. In addition, I don't think my sister has anything like this. The new baby has three boys 2-5 years older than he in the family, as well as an older brother, so he's not lacking for anything in terms of clothes, blankets, or toys. I really hope they like it.
 |
| The mat as a bag |
 |
| The bag can carry toys. |
In other news, while on my walk to the lake today I spotted a tree with lovers' initials carved into it long ago. I just had to take a picture. I know it's bad for the trees, but I thought it was just so sweet! I wonder if that couple is still together. What great joy it is to love someone, to welcome a new member to the family. It truly brightens the day just like sunshine!
 |
| Lovers' initials carved into a tree. |


Comments
Post a Comment