The Illustrated Life
 |
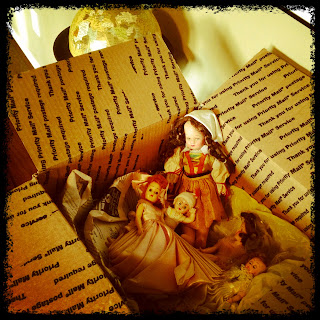
| A new project box |
 |
| My worktable |
 |
| Homemade pipe cleaner "pin curlers" |
 |
| Preparing a celluloid doll for restoration |
This week started with the baby having pus running out of his ear again and now we're all sick. So I haven't done much more than take photos. I do love my iPhone for its photo-taking ability. It is so easy to take pictures and videos when the phone is right there. For this series I used the Instagram ap and then further altered the images with the Photoshop Express ap. I decided the rough borders don't really work with the vintage tints. Next time I'll use the vignette border with the vintage tints.
Something about the Instagram images makes everything look so important and archival, as if these very mundane moments are already consigned to the vaults of memory. It is these very everyday happenings that are so often lost in life. They are replaced by important things and slip away until you can no longer remember exactly what your room looked like or how your grandmother's voice sounded. I think these photos look like memories to me also because they ARE the way my memories were preserved! Photos of my childhood are all same the round-cornered, faded, orangey variety, except for the occasional Polaroid square. I think too that anyone who grew up in the 70s must have the same mental image of living life in an orange haze. Our California house, where I lived until I was 3, exists in my mind as a dark orange riot of shag carpet and macrame, spider plants and Indian-print vinyl.
In California too, I remember a glut of string art on wood-paneled walls featuring ships, butterflies, owls, and mushrooms. I don't remember the string art being popular anywhere else, so maybe it was a California trend. For those of you who are too young to remember, string art was made by outlining a shape in tiny nails hammered into a board and then stretching colored threads from nail to nail in an intricate pattern to make the picture. It was actually pretty complicated; the resulting image was like a 3-D Spirograph picture. I can remember just being fascinated by the string-art pictures.
This week in my work-table images you'll see my method of rolling shorter doll hair on "curlers" made of pipe cleaners. You get a pin-curled, or rag-rolled effect with this technique. Make sure the hair is damp, but not soaking wet, when you roll it and let the curlers stay in overnight. I often use regular foam rollers on my dolls, but sometimes they are too big for the shorter doll hair. The Jenny doll you see here (the dark-haired doll; the blonde is a late Mandy doll with the newer face) has had a non-professional haircut at some point. It's not bad; she just has some extra layers, so I can blend them in using a curly style. The character I'm working on has curls anyway, so it will work. I also want to mention shoes for the My Friend dolls, since I've had a lot of requests for those. You can find old My Friend shoes on Bay, although people do tend to overcharge for them. My Friend dolls can also generally wear shoes advertised as fitting the vintage Sasha or Tomy Kimberly dolls. Sometimes the Terri Lee shoes will fit as well, although not with socks. I often by lots of doll shoes on eBay, mostly new/old stock, which is to say unopened packages of vintage doll shoes. I find the Horsman shoes advertised for 15 inch dolls will fit the My Friend dolls. They are snug, so you can't use them with socks or tights. You can also find doll shoes on the Internet by searching for doll supply companies. The web site will have instructions on measuring your doll's foot to find the size.
The small doll in the last picture is a celluloid doll I am restoring to be a doll for a doll. The Jenny character I am doing has her own doll, so I am redoing the little celluloid doll to go with her. I bought the celluloid doll in the doll box lot shown. It is a lot of VERY damaged dolls from the 1930s-50s. This particular little doll will need to be cleaned and re-wigged as shown in other blog entries. I will nee to make new clothes for her. Right now I am concentrating on removing her old clothes, which were stapled right to her body, without damaging her. Originally this doll was what is sometimes called a "fancy-dress" doll. They were cheap knock-offs of the Storybook dolls, meant to just stand on a shelf for display. Cheap as they were, they still have working sleep eyes and moving arms and even mohair wigs, so they make good little restoration projects for practice, as you can get them very cheaply. I won the whole box of dolls for a dollar. Shipping was high, but I sold the best doll, a Chinese bride doll, and still made a small profit on the lot. The main thing in doll restoration is to try to get as many dolls as you can to practice on. That way you'll learn how to work on many different types without damaging the material.
I am hoping we'll be better soon, especially by Friday when I have to cook 25 pounds of potatoes for a wedding reception at church! When we're well I'll continue my projects.


Comments
Post a Comment