 |
| The antiqued chair. |
Around 15 years ago, we bought a 1940s mahogany dining room suite from a local woman whose business was to buy and clean antique furniture, which she would then rent to interior designers, Realtors, and builders to stage homes for sale. When she was unable to move a particular set she would sell it in the classified ads for a wonderful price. Anyone in the know would watch the paper for her stuff and rush out to buy it.
 |
| The chair before. |
Our set is a dark red mahogany group pretty typical of the 1940s. I think the style is Sheraton. It's not overly adorned; the pieces have graceful curving lines. We chose this set because its petite size fits in today's smaller dining rooms, but the sideboard and china cabinet still have roomy drawers that provide a great deal of storage. The drawers are entirely made of wood, with dovetailed joints; quality you can't buy new anymore! The table features a really neat leaf which attaches underneath the top and then unfolds with the flip of a switch beneath the table top. We can seat at least eight without storing a leaf in a closet or under a bed. My favorite thing about the set, though, are the needlepoint chair seats. As soon as I saw those I knew this was the set for me! The pattern echoes the folkloric painted pieces I grew up with. They give the set a homey Scandinavian feeling I love.
We bought the set understanding the chairs needed to be re-glued. Over the years they've gotten progressively more rickety. Besides that, years of puppy teething, children coloring, homework, and holidays have beaten up the finish even more than it was when we bought it. This was our only dining table for many years. The
coup de gras, however, is a large white burn in the finish inflicted one Thanksgiving when my brother in law set a hot sweet potato casserole on the table without a trivet. After the burn, we knew the set had to be refinished. As the stain was scraped off over time we discovered the wood is actually what's called light or white mahogany. It had been stained deep red when the dark look was in style.
 |
| The burn in the table's finish. |
I always thought the finish on the set was very pretty. The deep red looked good with the finishes in our old house and with our dishes. Here in this new house, however, the red seems heavy and garish. Everything in this house is the color of sunlight, straw, or oyster shell. I thought at first we might sand off the old stain and just put polyurethane over the light pinkish-gold wood to bring out its natural striations. After thinking more about it, though, I worried the white mark might not come off easily, and that sanding all the little grooves in the wood would be really difficult and time consuming. I decided I wanted the set to look like my grandmother's writing desk and some other pieces she "antiqued" in the 1960s.
 |
| My grandmother's antiqued chair on the left was the inspiration. |
My grandmother was an amazing decorator. She was able to combine French Provincial antiques with Danish modern 1950s and somehow make it all look fresh and up to date and coordinated. She used color to unite disparate styles to great effect. She was also a frugal decorator. Many of her pieces were dark 1940s mahogany she bought for cheap in the 1960s when they went out of style and refinished. Back then you could buy "antiquing" kits to refinish furniture. Besides the writing desk, another furniture piece antiqued with one of these kits is the turquoise trunk at the foot of our bed shown in my "Floorathon" post. Although antiquing kits are no longer sold, I decided we could replicate the look with chalk paint and metallic wax.
But first, Jerry re-glued the chairs. This is difficult because it involves taking the chairs apart at the joints and gluing the seams with wood glue. These were so fragile they also required wood screws and nails to reinforce the joints. When the chairs were sturdy again, we were able to paint them.
We started with homemade chalk paint. I used the recipe from the i heart naptime blog. The post was pinned to Pinterest:
http://www.iheartnaptime.net/chalk-paint/. I followed the recipe shown in her post: 2 cups latex paint, 2 tablespoons water, 4 tablespoons Plaster of Paris. Because I wanted a slightly shimmery, opalescent look just like the old antiqued furniture, we used semigloss paint. I chose Olympic One semigloss in "Milk Paint".
 |
| We used Rub n Buff metallic wax. |
For the first chair we followed the directions on the naptime blog exactly. First, we applied the metallic wax. There are a couple different brands of this, including Treasure Wax and Rub n Buff. I chose Rub n Buff in Silver Leaf. I LOVE this stuff! I may have to wax everything we own! You just rub the wax on with your finger or a Q-Tip or makeup sponge. You can also mix it with oil paint to tint it further. It looked so cool when we first rubbed the silver over the mahogany we almost decided to just rub the entire finish with silver! On second thought, we decided that would cost as much as buying a whole new set.
 |
| Either before or after painting, rub the wax on with a Q-Tip, sponge, or your fingers. |
Just as shown in the blog post, after we rubbed on the silver we went back over it with petroleum jelly. Then we applied our paint. We ended up putting on three thin coats. It looked good after just one, though, too. It really depends on your personal taste how opaque you want the color. The more transparent, the more you can see the brush strokes and original finish showing through, and the more distressed the style. After the chair dried overnight we went back and sanded off the paint we'd applied over the wax.
 |
| If you apply the wax first, cover it with Vaseline to make it easy to resist the paint. |
However, even though we mostly used paper towels rubbed vigorously over the paint rather than sandpaper, too much paint came off for me, and too much silver wax came off with the paint. The look was more distressed than I had envisioned, and had too much contrast for me. I went back over that chair with a very thin coat of paint, just to knock back the contrast. On the other chairs we went ahead and painted the three coats of paint first and then applied the silver wax.
 |
| Applying the wax and Vaseline first results in a very distressed finish. |
 |
| The chair with distressed finish. |
When the paint was dry, we went back over the silver spots with a makeup sponge and our fingers. I painted the wax into the grooves with a tiny paintbrush. Then we lightly brushed the entire chair here and there with a very thin layer of wax. The look I wanted was of a formerly ornate chair on which the silver had randomly rubbed away over time.
 |
| Applying the wax after painting gives a less distressed look. |
I traced the center medallion and drew an acorn and oak leaf motif on it. This coordinates with the drawer pulls and door knobs on the rest of the set. I cut a stencil from drawing paper and dabbed silver wax over it to transfer the motif to the medallion. Then I went back with a tiny brush and touched the stenciling up a bit to make it look more finished.
 |
| Apply the stenciling with a makeup sponge. |
 |
| The completed stencil. |
The last step was to apply paste wax to protect the finish and reattach the chair seats. I really like the classic off-white and navy color scheme. It is both stylish and timeless. The plan is to go on to the table and other pieces. When all the pieces are finished I plan to display our blue and white china in the cabinet. On the sideboard I want an array of silver and glass pieces. I think I will go back to Mary Jo's and see if they still have a gray silhouette fabric I liked to make a window valence.
 |
| The stencil ties in with the needlepoint. |
My hope is the end result will have the light and airy feeling of my grandmother's house combined with the Scandinavian traditional patterned pieces of my Norwegian grandparents. I will keep posting updates as we finish the room.
 |
| We picked out the carving with the wax and then applied it more randomly over the paint. |
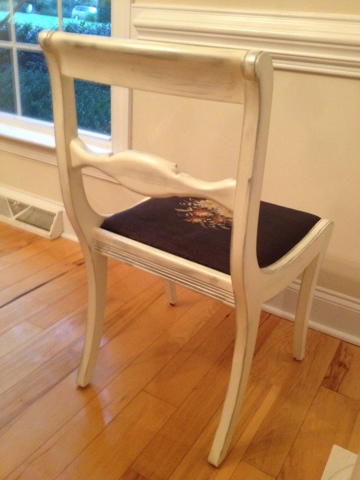
 |
| More views of the finished chair. |


Comments
Post a Comment